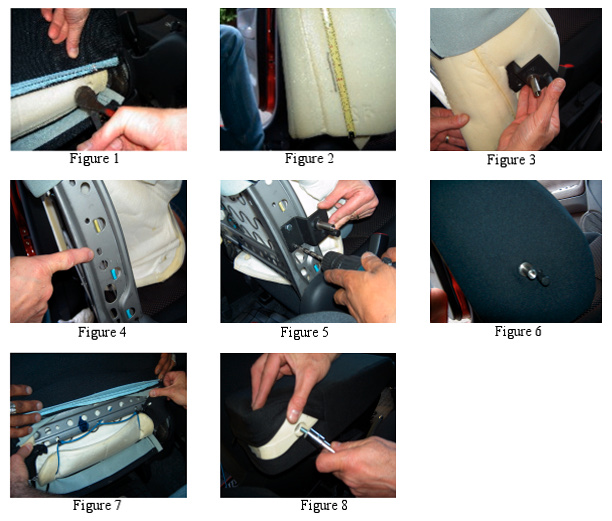
Installation:1) Move passenger & driver seats forward. Tilt the backrest of the driver seat forward. From the back seat, open the three rings at the bottom of the backrest using the two different pliers or just cut the rings off using the wire cutters (see Figure 1 below). They hold the upholstery together at the bottom and will not be reused. 2) Undo or cut the two rings holding the cloth at the bottom corners, and the two in the middle that hold the rubber straps. Remember how they came off because you will be putting them back at the end of the installation. Lift the upholstery about 2/3 of the way up the backrest. 3) Using the tape measure, make a vertical line
on the foam. The line should be parallel to the parting line on the
foam, one inch forward. The line should measure 2.5 inches long, starting
at 3 inches from the bottom of foam to 5.5 inches from the bottom
of foam 4) With the razor, cut all the way through the foam on the line made in step 3. Put the bracket through the foam (see Figure 3 below) and attach the top bolt and nut utilizing the oblong hole shown in Figure 4. 5) At this point, temporarily slide the armrest over the threaded shaft on the armrest and adjust the armrest pitch to suit your comfort. Mark the position of the bracket's bottom hole, remove the armrest and drill a 9/32" hole into the seat frame using the bracket's bottom hole as a guide (see Fig. 5). 6) Install the bottom bolt and nut. Bring down the upholstery right over the bracket. Make two small holes with the scissors to accommodate the two shafts (see Fig. 6). Important! Make sure the fabric goes over the base of the threaded shaft. 7) Secure the 2 rubber straps and 2 fabric flaps
using the tie-wraps supplied (see Fig. 7). Cut off the excess stems.
Close the back flap with the remaining three tie-wraps and cut off
stems. Now its time to install the armrest. Installation is complete.
|